
Delightful Details: A Mignon Matchbox Project to Try at Home
- Erika Stefanutti
- May 16, 2024
- 3 min read

I like to attend to small details both in my work and at home, and this is the perfect example of how a tiny bit of color and pattern can yield a charming result. I can't remember when I started making these matchboxes-- it's been forever-- but even after all these years, I still find it useful to keep a batch of these on hand to use as gift toppers when I give a scented candle as a gift.

Of course, I'm not alone in my fascination with small embellishments like these. The great Roger Banks-Pye famously added decoupaged or hand-drawn patterns to his matchboxes. His 1997 book, Inspirational Interiors: Colefax and Fowler, is a favorite of mine, and is replete with creative decorative details. According to RBP, "no object is so humble that it should not be given a decorative treatment." I couldn't agree more.


Above, images from Inspirational Interiors: Colefax and Fowler, by Roger Banks-Pye, 1997

Even for the most craft-averse among us, decorative matchboxes are pleasing and easy to make, using store-bought matchboxes simply sandwiched between rectangles of cardboard that have been covered in beautiful patterned paper.
Here's what you'll need:
Matchboxes, any size will do. I've done this project with matchboxes in two sizes that I found in the kitchen drawer.
Cardboard about 1/8" thick. You can use bookbinding board like I do, or any scraps from packages or framer's matboard that you may have around the house.
Decorative paper. This is a great way to use the smallest scraps of beautiful gift wrap, origami paper, etc.
PVA white glue and a brush to apply it.
You'll also need scissors, a craft knife, a metal ruler and, if you have it, a teflon folder will be handy.

To begin, calculate the size of the cardboard pieces you'll need. To do this, measure your matchbox and add 1/8" border all around as shown below. To determine the size of the paper covers, add 1/2" to all sides of the cardboard pieces. I like to make templates for these parts, which I then trace onto my cardboard and paper.

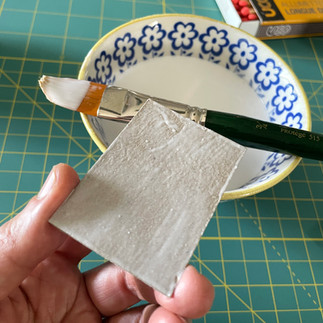
One you've cut out all of your pieces, glue the cardboard rectangles to the decorative paper. Clip the corners of the paper about 1/8" away from the cardboard corners. You'll then have four flaps that need to be folded over and glued into place. I like to start with the long sides. Tuck in the paper corners at each end and repeat the folding and gluing process for the two short sides.


You'll end up with two little rectangles that look like this.

This is quite a quick process, so when I make matchboxes, I like to make a big batch at once- very pleasing.

Next, remove the sliding tray from your matchbox and apply a coat glue to the top side of the sleeve. Center it onto one of your cardboard rectangles and press into place.


Repeat this process for the second side. Make sure there's no glue oozing out at the ends and slide the match tray back into place. Put the finished piece under a heavy book to allow the glue to fully set.


I made a few matchboxes in a larger size, too, and the process is the same. My larger matchboxes happen to have a logo on the striker side, which isn't ideal. If you have a similar situation, you can easily cut a strip of fine grit sandpaper and attach it to the box with double-sided tape. I didn't bother as these are just for me, but if I was giving these as part of a gift, the addition of plain sandpaper might be a nice finishing touch.


William Morris famously said, "The true secret to happiness lies in taking a genuine interest in all the details of daily life." I hope you'll give this project a try, and I think you'll find that the next time you light a candle, these colorful little matchboxes will make it just a bit more enjoyable.

Souvenir is the blog for Parvum Opus, an artist-run studio specializing in artistic decorative objects and home furnishings. We welcome your thoughts! Comment below to join the conversation, and if you enjoyed this, don't forget to subscribe to receive an email when we publish new posts.
I love this! Have always been interested in all things “paper” and this is a beautiful little piece of paper art that is next on my list to try.